
Epson l1218 resetter free download Adjustment Program
Resetting an Epson L1218 printer typically involves resetting the ink pads or performing a factory reset. Here’s a general guide on how to perform these resets. epson l1218 resetter free download. Note that the exact steps can vary depending on your model and firmware version, so it’s always a good idea to check your printer’s manual or Epson’s website for the most accurate information.
Epson l1218 resetter free download windows xp, 7, 8, 8.1, 10, 11 support x86 and x64 bit

1. Resetting Ink Pads:
The ink pads in your Epson printer collect excess ink during printing. When they become full, you might need to reset or replace them. For the L1218, you can follow these steps:
- Download the Epson Adjustment Program:
- This is a utility provided by Epson that allows you to reset the ink pads. It might not be officially available from Epson’s website, so you may need to look for a reliable source. Be cautious and ensure you download it from a trustworthy site.
- Install and Run the Adjustment Program:
- Install the software on your computer and run it Epson l1218 resetter.
- Select Your Printer Model:
- Choose “L1218” from the list of available models.
- Choose the “Waste Ink Pad Counter” Option:
- Select this option to start the reset process on Epson l1218 resetter.
- Follow On-Screen Instructions:
- The program will guide you through the steps to reset the ink pads. Make sure your printer is connected and turned on during this starting process.
- Complete the Reset:
- After the reset is complete, you may need to restart your printer.
To install and run the Epson Adjustment Program for an Epson L1218 printer, follow these steps. This program is used to reset various counters and is particularly useful for resetting the waste ink pad counter. Note that the Adjustment Program is not officially provided by Epson but can be found through various online sources. Be cautious and ensure you’re downloading it from a reputable site.
Steps to Install and Run the Epson Adjustment Program:
1. Download the Epson l1218 Adjustment Program:
- Find a Trusted Source:
- Search for “Epson Adjustment Program L1218” on a reputable website. Be careful to download from a trusted source to avoid malware or viruses.
- Download the Program:
- Download the file to your computer. It may be in a compressed format (like .zip). Make sure you have appropriate antivirus software running before you download and unzip files.
2. Extract and Install the Program:
- Extract the Files:
- If the program is in a .zip file, right-click on the file and choose “Extract All” or use a file extraction tool (like WinRAR or 7-Zip) to extract the contents.
- Run the Installer:
- Locate the extracted folder and find the installer file (usually named something like
AdjProg.exeor similar). Double-click on it to start the installation process l1218 resetter.
- Locate the extracted folder and find the installer file (usually named something like
- Follow Installation Instructions:
- Follow the on-screen instructions to install the program. You might need to agree to terms and conditions and choose an installation location.
3. Run the Adjustment Program:
- Connect Your Printer:
- Ensure your Epson L1218 printer is connected to your computer via USB and turned on.
- Open the Adjustment Program:
- Navigate to where the program was installed and double-click on the executable file to launch it.
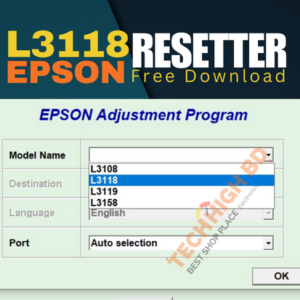
- Select Your Printer Model:
- In the Adjustment Program, select your printer model (Epson L1218) from the list.
- Choose the Function to Perform:
- Select “Waste Ink Pad Counter” or the specific function you need. This is usually found in the “Particular Adjustment Mode” or similar section.
- Start the Reset Process:
- Follow the on-screen instructions to reset the waste ink pad counter. You may need to click on “Check” and then “Initialize” or similar options.
- Complete the Reset:
- The program will guide you through the steps. Once completed, it’s often recommended to turn off the printer and turn it back on to finalize the reset.
More Resetter Download: ((Epson L3210 resetter free download))
4. Final Steps:
- Restart Your Printer:
- After completing the reset, turn off your printer, wait a few seconds, and turn it back on.
- Check Printer Status:
- Verify that the reset was successful by checking the printer’s status or printing a test page.
Important Considerations:
- Backup Data: Ensure any important settings or data are backed up before running the program, as it may reset configurations.
- Printer Condition: If the printer continues to show error messages or problems after a reset, there might be additional issues with the hardware or software.
- Legal and Safety Risks: Be aware that using unofficial software can pose risks, and it’s advisable to use official tools and support whenever possible.
2. Factory Reset:
A factory reset can help if you’re facing issues unrelated to the ink pads.
Turn on the Printer:
- Ensure your printer is turned on.
- Access the Menu:
- Press the “Home” button on the printer to access the menu.
- Navigate to Setup:
- Use the arrow keys to navigate to the “Setup”option in the menu.
- Select “Restore Default Settings” or “Factory Reset”:
- Find the option to restore or reset the printer to its factory settings.
- Confirm the Reset:
- Follow the prompts to confirm and start the reset process Epson l1218 resetter.
- Restart the Printer:
- Once the reset is complete, the printer may restart automatically or you might need to turn it off and on again.


Facebook: techhighBD
https://web.facebook.com/techhighbd YouTube: techhighBD
Web: techhighBD

Important Notes:
- Data Loss: A factory reset will erase all custom settings, so you may need to reconfigure your printer settings afterward.
- Ink Pad Reset: If the ink pads are full, simply resetting them might not be enough, and you might need to replace the ink pads physically.
If you run into any trouble or if these steps don’t seem to match your printer’s options, checking the official Epson support page or contacting their customer support can provide further guidance.


.png)
.gif)